In this article we explain how to create and update users. There are two different ways to do it:
- Create and update individual users, this is the quickest way when you don’t have to create or update a lot of users. For example, you have to onboard two new employees.
- Create and update multiple users using “User bulk upload” functionality, this is the quickest option when you have to create and/or update a lot of users. For example, onboarding all the employees.
Before you start creating and updating users, make sure you are ready:
- In case you want to include demographic data to the users, such as age, gender and role, make sure you have configured the demographic data options. If you haven’t, please read this article: “How to modify, add or remove the demographic options”.
- You have created the circles, as you will need them to be able to create or update users. If you have not, please read this article: “How to create circles”.
- You are familiar with the roles, Magenta, Aqua, Teal and Yellow, as you will have to assign a role to each circle. If you are not, please read this article: “Which is the difference between Magenta, Aqua, Teal and Yellow roles”.
1. Create and update individual users
Follow the below steps to create a user:
- Login to your atwork suite.
- On the menu click on “User manager”.
- In the top left corner, click on “Add user”.
- Fill the basic information, name, surname, and email address. These fields are mandatory to create the user.
- Fill the demographics, this data is not mandatory to create the user. Depending on your tenant rights, you might not be able to see this information.
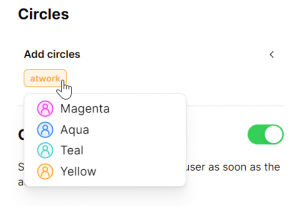
- Uncollapse the “Add circle” section and select the circles the user is going to participate.

- Choose the role of each circle by clicking on the circle chip and selecting the color.
- If you want to send the onboarding email to the user, leave the toggle on; in case you don’t want to send it, toggle it off.
- Click on “Confirm”.
- The user has been created, you can find them by using the search bar.
Follow the below steps to update a user:
- Login to your atwork suite.
- On the menu click on “User manager”.
- Click on the edit button for the user you want to update.
- Update the data.
- Click on “Confirm” to save the changes.
2. Create and update multiple users
- Login to your atwork suite.
- On the menu click on “User manager”.
- On the top left corner click on “Bulk upload”.
- Download the template.
- Fill out the template, important to don’t change the format. Remember, you can’t process more than 1000 users in a file. To handle more users, please perform the operation in batches of maximum 1000 users.
To create users, all the fields are mandatory except demographic data.
To update users, the mandatory fields are action and email address, the rest are optional. Only fill the data you want to update, the data you don’t want to modify leave it empty.- Action:
- create: mention “create” when you want to create the user,
- update: mention “update” when the user already exist in the platform and you want to update their data.
- Name and Surname as well as Email address. Note that the email address must be unique.
- Language: the five possible values are EN (English), FR (French), DE (German), IT (Italian) and ES (Spanish).
- Circles and Roles:
- Circle and Role fields go by pairs. RoleX is the role that the user will have on CircleX.
- There are 4 possible role values from most access to less access: MAGENTA, TEAL, AQUA, YELLOW.
- Each circle can be assigned to a different role.
- The role of a user on a child circle is at the minimum the role that the user has on the parent circle. For example, it is not possible to have a role MAGENTA on the company circle and the role YELLOW on a lower department circle.
- All circles that a user belongs to must be specified, from the company circle all the way down to the lowest levels.
- When updating a user, in case you want to add circles, you will have to mention all the circles the user is already participating and the new ones, otherwise the system will remove the existing ones.
- Demographics:
- The data is not mandatory, the fields can remain empty.
- Fill the data with the English option, otherwise the system will not recognize the data and will throw an error.
- The date format has to be MM.DD.YYYY or MM/DD/YYYY.
- Action:
- Upload the Excel.
- You will be redirected to the summary page and on the step where you decide to send the onboarding email or not. Should the users immediately receive an onboarding email? If the answer is yes, make sure the toggle button is switched on. If it is no, make sure that the toggle is off (anyways it is always possible to resend all outstanding invitations at a later stage).
- Click “Continue”.
- Hang tight for processing. Depending on the number of users, it can take time for the file to upload. All the way up to 3 minutes.
- On the last screen is where you will see a resume of the upload. Here the system mentions:
- created users;
- modified users, and;
- failed users, these users haven’t been created or updated.
Example:
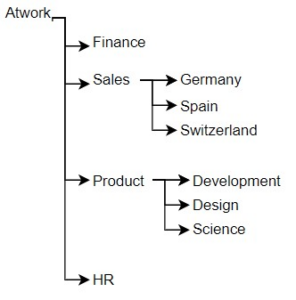
A company needs to create few users on the platform, they have the below circle structure:

The roles of the users are:
- User 1 is the HR manager who will set up the platform.
- User 2 is the manager of Product and she wants to see the results of the strategic surveys launched to Product.
- User 3 is the manager of Sales and Finance and he wants to see the results of the strategic surveys launched to Sales and Finance.
- User 4 is a team lead of Development and she wants to launch custom surveys to her team.
Below an example of the Excel we will upload:

Possible errors:
While processing the file you could get some error messages, below we have listed them and we display some tips on how to solve them:
- “The selected file is not an Excel. Please use the template for bulk-uploading users.” – that’s because the file you are uploading is not an Excel, the best way to avoid this issue is to use the provided template.
- “The header of your document does not match the specification. Please use the template for bulk-uploading users.” – that’s because the header of your file is not correct, we advise to download the template and not modify the header.
- “Check that you have correctly typed “Create” or “Update” in the Action field.” – that’s because for one or more users the action is incorrect, the two possible actions are “Create” or “Update”.
- “Some users are missing “Create” or “Update” in the Action field.” – that’s because for one or more users the action is not provided, the two possible actions are “Create” or “Update”.
- “The following circle(s) [WrongCircleName, WrongCircleName, etc] do(es) not exist. Please, check your list of circles.” – that’s because the mentioned circles do not exist in the platform. In case you have not created them, first create the circles and after create the users.
- “Invalid demographic option(s) for [Field1, Field2, Field3,etc]. Make sure to use the same options as in company settings.” – that’s because the demographic options you used for the mentioned fields are not correct. Make sure you are using the English option and the options exist on the system. To check, you can navigate to “Company settings” and have a look on the “Demographic data” section.
- “Invalid user email provided” – that means the email address you have provided is not in the system.
- “Invalid role(s). Make sure you assign magenta, aqua, teal or yellow to the role of each circle.” – that’s because in the role column you have not mentioned a role or you have made a mistake. Check the role columns and make sure you have magenta, aqua, teal or yellow.
- “Invalid role(s) for some circle(s). Child-circles can’t have lower roles than parent circles.” – that’s because you assigned a wrong role to a circle. Check the roles of this user and make sure you have not assigned to a child-circle a lower role than the parent circle.
